Pages

Showing posts with label Stampin Up 3-D Ideas. Show all posts

Wednesday, July 4, 2012

Stampin' Up! Petal Cone - Happy July 4th!

Do you have plans to celebrate today with family and friends?  How do you plan on decorating the table that will hold all of the yummy food?  I have an idea for you, but you'll need to get started creating it early in the day so you'll have your table decorated prior to food being served.  Making several of these would further enhance your table.

This table decoration features the Stampin' Up! Petal Cone Bigz L Die.  I love his die and use it often. 


(Click on the pictures to enlarge)


SUPPLIES:

Paper: Real Red Cardstock (102482), Whisper White Cardstock (100730), Night of Navy Cardstock (100867), Silver Glimmer Paper (124005), and Red Glimmer Paper (121790) 
Accessories:  Big Shot Die-Cutting Machine (113439), Petal Cone Bigz L Die (121810), Retired Stars #2 Original Die, Full Heart Punch (119883), Strips Embossing Folder (123128), Vanilla Shimmer Smooch Spritz (118772), Adhesive of your choice, and Fourth of July decorations from a local craft store


To make this table decoration, follow these steps:
  • Cut 3 petal cones using the Petal Cone Die - 1 Whisper White, 1 Real Read, and 1 Night of Navy
  • Emboss each cone with the Strips Embossing Folder
  • Spritz each with the Vanilla Shimmer Smooch Spritz
  • Fold along each score line
  • Adhere the Real Red cone to the Whisper White cone, lining up the embossed strips
  • Adhere the Whisper White cone to the Night of Navy cone, lining up the embossed strips
  • Lay the adhered pieces face down (at this point you have not adhered the Night of Navy flap yet)
  • Adhere your craft store decorations about 1" down from the top portion of the Whisper White cone (you will need to cut a small half circle from the top of each cone so that when you close and adhere the final pieces together, the decorations fit nicely into the top)
  • Place adhesive on the flap of the Night of Navy cone and adhere it to the Real Red cone, folding under the flaps of each cone
  • Adhere the folded flaps to each other
  • Set the adhered cones down on Real Red Cardstock and trace around it
  • Cut out the traced piece of Real Red Cardstock and adhere it to the bottom of the cones (this provides a bottom cover to hide the flaps)
  • Using the Stars #2 Die (or a star punch), cut out stars from the Red Glimmer and Silver Glimmer paper and Night of Navy Cardstock
  • Adhere the stars onto the final adhered cone where desired.
  • Decide on your sentiment and place it onto Whisper White Cardstock
  • Using the Full Heart Punch, punch out the sentiment from the Whisper White Cardstock, as well as a heart from the Read Glimmer Paper and Night of Navy Cardstock
  • Layer the hearts as shown in the pictures and adhere them to the cone
  • Enjoy
Got questions, click on the "Ask Questions" button on the header and sent them to me!


God's Blessings!


Guneaux Designs by Beverly Polen

Monday, July 2, 2012

Stampin' Up! Designer Rosette Bigz XL Die

What a special week this is, and it has been since July 4, 1776 when the U.S. declared its independence from the Kingdom of Great Britain.  Do you have special plans for celebrating the 4th?  I plan to spend the early evening at an outdoor concert and afterwards watch beautiful fireworks.

It can get quite hot here in Florida, so I decided to make a hand fan to use while at the concert.  Of course it has to be patriotic.  I think it is so cute, and it is actually quite sturdy.


The steps I followed to make the hand fan are:

  • Cut an 11" x 5-1/4" piece of Real Red, Whisper White, and Night of Navy Cardstock
  • Place each piece onto the Stampin' Up! Designer Rosette Big XL Die (125594) and run through the Big Shot (113439)
  • Cut off the pointed ends of each rossette
  • Fold each piece into accordian folds
  • Glue the three pieces together
  • Add glue to the ends of the rosettes and dip them into Silver Glass Glitter (120995) - let it dry
  • Insert a piece of twine into the half-circles along the bottom of the rosettes and tie them together tightly (this will cause the pieces to spread into a fan)
  • Cut an 11" x 1-1/2" piece of Real Red Cardstock
  • Score this piece at the 1/2" and 1" marks
  • Fold along the two score lines and glue the piece together to form a band for the outer sides of the fan
  • Glue the band onto the outer edges of the fan, leaving the very bottom unglued
  • Use a glue gun to apply hot wax at the very bottom of the fan to further reinforce and stabilize it

  • Decorate as desired  

God's Blessings!

 Guneaux Designs by Beverly Polen

Friday, April 6, 2012

Stampin' Up! Faberge-Styled Easter Egg

Hello, my friends!  First I want to share why I have been absent from my blog for several days.  I have been out of town taking care of my brother, Bill, who was in a grave health situation.  With powerful prayers and the grace of God, a miracle occurred with him and I praise God for His healing blessings.  My brother has a long journey to a complete recovery, so if you have an inclination to pray for him, your prayers would be greatly appreciated.  I plan to get back to daily postings. 

For today, I am sharing a cute Easter egg that I made with a 6" x 4" egg-shaped piece of styrofoam. 

I cut an opening in the front of the styrofoam and then removed most of the inside.  I used a craft paint to paint the inside pink and the outside yellow.  I placed some carefully-cut Lucky Limeade cardstock just inside the opening for grass.  I stamped two flowers and glued them on small pieces of floral wire and placed them inside behind the grass.  At the back of the inside I placed the primary element of the egg - the cute bunny.  To decorate the opening of the egg, I glued on some retired Stampin' Up! ribbon.


This picture is a side view of the Easter egg.


This is the key element of the Easter egg, the bunny.  To give the bunny an extra "punch", I glued Stampin' Up!'s retired Mica Flakes onto its body.

Enjoy!!

Friday, March 4, 2011

SUNNY GARDEN DESIGNER SERIES PAPER - HOSTESS GIFT BOX

HOSTESS APPRECIATION

I work diligently to let my workshop hostesses know how much I appreciate them.  The following pictures are of a hostess gift box that I created for my last workshop hostess.  I love the Stampin' Up! Sunny Garden Designer Series Paper as it's so bright and cheerful.  I have been wanting to use the paper for something special; therefore, I used it in creating the hostess box. 


As you can see, I inserted an abundance of different ribbon in the box.

  God's Blessings!
Guneaux Designs by Beverly Polen
Stampin Up Demonstrator in Florida


FIRM RELIANCE ON DEVINE PROVIDENCE!

Monday, January 31, 2011

PETAL CONE #5 and FUN FLOWERS

Thanks for stopping by!  Your visits are greatly appreciated.

Loving the two new Stampin' Up! Bigz Dies in the Occasions Mini Catalog, I had to make another 3-D item with the Dies -- a door hanger.  The Petal Cone Bigz Die is absolutely so much fun to use as you can make so many items with it.  And the new Fun Flowers Bigz Die is equally as much fun.  I think using the two together creates awesome art! 

I created this door hanger for a workshop hostess, Michelle.  I hope she enjoys it as much as I did creating it.

I created the door hanger with one of my favorite card stock colors, Rose Red.  I also used the beautiful, new Stampin' Up! fabric from the Springtime Vintage collection.  After running the Petal Cone Die, card stock, and fabric through the Big Shot (a must have tool), I used the Anywhere Glue Stick to adhere the fabric to the card stock (the Glue Stick works wonderfully on the fabric).  Next, I adhered one side of the cone together using Sticky Strip.  Before adhering the other side of the cone, I inserted in the bottom of the cone two pieces of Pear Pizzazz Seam Binding Ribbon, which is new in the Occasions Catalog.

I used the Fun Flowers Bigz Die to cut and create the three flowers made with the Springtime Vintage Designer Series Paper and hot-glued them onto Pear Pizzazz Seam Binding Ribbon-covered bamboo skewers.  The center of the flowers were embellished with the Sale-a-bration Ice Cream Parlor Melon Mambo Buttons that are part of the FREE Ribbon & Button Pack when you purchase $50 in products or host a $300 net-sales workshop.  I also used the Pear Pizzazz Seam Binding Ribbon to create the handle of the door hanger.

Finally, I used the angel stamp from the Clearly for You stamp set to stamp on two of the scalloped flaps with Whisper White craft ink and White Embossing Powder.

In this post, all Stampin' Up products are listed with a direct link to each product.  Don't waste time searching for item numbers; click on the blue links to go directly to the items.

Enjoy the door hanger!


God's Blessings!
Guneaux Designs by Beverly Polen
Stampin' Up! Demonstrator in Florida


FIRM RELIANCE ON DEVINE PROVIDENCE!

Friday, January 14, 2011

PETAL CONE #4 - WALL SCONCE

Today's share is my last for the Stampin' Up! Petal Cone Bigz Die, or at least for a while.  It is a wall sconce with flowers.  I used the Springtime Vintage Designer Fabric to cover the Petal Cone.  The Anywhere Glue Stick is wonderful for adhering fabric to card stock.  I embellished the Petal Cone with the new Stampin' Up! Baja Breeze Glass Glitter (love this color!) and Marina Mist Taffeta Ribbon.

The wall sconce is filled with flowers made with the new Fun Flowers Bigz Die, Springtime Vintage Designer Series Paper, Springtime Vintage Big Designer Buttons, and the Baja Breeze Glass Glitter.  The pictures were taken with the Sconce hanging on my wall.  Enjoy!


Purchase the Stampin' Up! items by placing your cursor over the blue links above.  The links take you directly to the product.

Enjoy your weekend and come back Monday!

God's Blessings!
Guneaux Designs by Beverly Polen
Stampin' Up! Demonstrator in Florida


FIRM RELIANCE ON DEVINE PROVIDENCE!

Thursday, January 13, 2011

KEY TO MY HEART VALENTINE BOX AND MATCHING VALENTINE CARD

9/2012 CHECK OUT MY NEW WEBSITE HERE!
-----------------------------
1/30/12 UPDATE:  YOU MUST SEE MY NEW VALENTINE BOX HERE!

Hello and thanks so much for stopping by.  Enjoy your time on
Guneaux Designs!
Until I complete my last two designs with the Stampin' Up! Petal Cone Bigz Die, I will share one of my creations for Valentine's Day.  I think my Key to my Heart Valentine Box is adorable.  It took some time to make but it was worth it.  And the matching Valentine Card is just as darling.

 To purchase any of these items, place your cursor over the above blue links and you will be taken directly to the product. 

How to make the Valentine Box?  If interested in a tutorial for making the Valentine Box, let me know through your "comments" on this post.  


COME BACK FOR FUTURE PETAL CONE CREATIONS AND MORE! 
LET ME KNOW THE PRODUCTS YOU WANT FEATURED ON GUNEAUX DESIGNS

God's Blessings!
Guneaux Designs by Beverly Polen
Stampin' Up! Demonstrator in Florida


FIRM RELIANCE ON DEVINE PROVIDENCE!

Monday, January 10, 2011

PETAL CONE #3 - NAME TAG

Hope everyone had a blessed weekend!  Gee, the weather in Central Florida is a little rough today.  The folks north of me had small hail earlier today....IN FLORIDA!!  The wind was strong enough that it blew down one of my downspouts!

Now, to the fun stuff!!  Yesterday I had a private workshop in my home for previous hostesses and special friends.  WE HAD A BLAST! 

For each guest, I made a name tag using the Stampin' Up! Bigz Die, Petal Cone, which I dry embossed with the Stampin' Up! Perfect Polka Dots Empossing Folder.  I used Real Red card stock to create the name tag and the new Stampin' Up! Fun Flowers Bigz Die and the Jolly Holiday Designer Series Paper to create the flowers on the front of the the tags.  The "banner" from the Petal Cone Bigz Die was perfect to place the name of each each guest.  I adhered it to the back of the name tag; therefore, each guest got to enjoy the floral front of the tag while the others could see her name. 

I am so in love with the Petal Cone Die!!  I promise you will have fun with it when you purchase it!  Enjoy!!


This picture is of us having fun (I'm not in it as I was behind the camera).


Those guests who didn't show up missed out on a lot of FREE goodies!


COME BACK TOMORROW TO SEE WHAT I FEATURE!

God's Blessings!
Guneaux Designs by Beverly Polen
Stampin' Up Demonstrator in Florida


FIRM RELIANCE ON DEVINE PROVIDENCE!

Thursday, January 6, 2011

PETAL CONE BIGZ DIE

 Thank you for stopping by today!  My share today is one of my creations using the new Stampin' Up! Petal Cone Bigz Die from the new Occasions Mini Catalog.  This die is one to buy.  You can create more than a cone with it, and tomorrow I will share other creations made with the cone.

 The petal cone is embellished with two of the beautiful Stampin' Up! Embossing Folders, Elegant Bouquet and Perfect Polka Dots.  The new Stampin' Up! Designer Series Paper, Love Impressions, was used to make the paper "LOVE" heart and two of the cone's petals.  The charming pink button and the red one below is from the Big Designer Buttons, Candy Cane, which became unavailable on January 3th when the Holiday Mini Catalog expired.  As is with the red button, the pink button is threaded with the retired Stampin' Up! Silver Elastic Cord.  The handle of the cone is the Stampin' Up!'s Real Red 1/8" Taffeta Ribbon.


This side of the cone shows the "friend" stamp from the I {Heart} Hearts stamp set and the big beautiful red button.  
The same red ribbon was used on this side of the cone and threaded through an old pink heart brad that I dug out of my collection.  This side shows more clearly the embossing with the Elegant Bouquet Textured Folder.

Inside the cone is lace tulle and it is filled with yummy heart shaped chocolate.
Please enjoy and email me with any questions.  Come back tomorrow to see my next creation with the Petal Cone!  Comments are appreciated as they let me know what you enjoy on my site and gives me information on what you would like in future postings.

Lastly, any item highlighted like this will take you directly to my Guneaux Designs store where you can enjoy shopping!  Therefore, place your cursor over the highlighted words, click, and shop!  I challenge you to be the first one to shop at my store within the next 24 hours!  An award awaits you!

God's Blessings!
Guneaux Designs by Beverly Polen
Stampin' Up! Demonstrator in Florida


FIRM RELIANCE ON DEVINE PROVIDENCE!

Tuesday, December 14, 2010

How to Make a Candy Cane Christmas Wreath

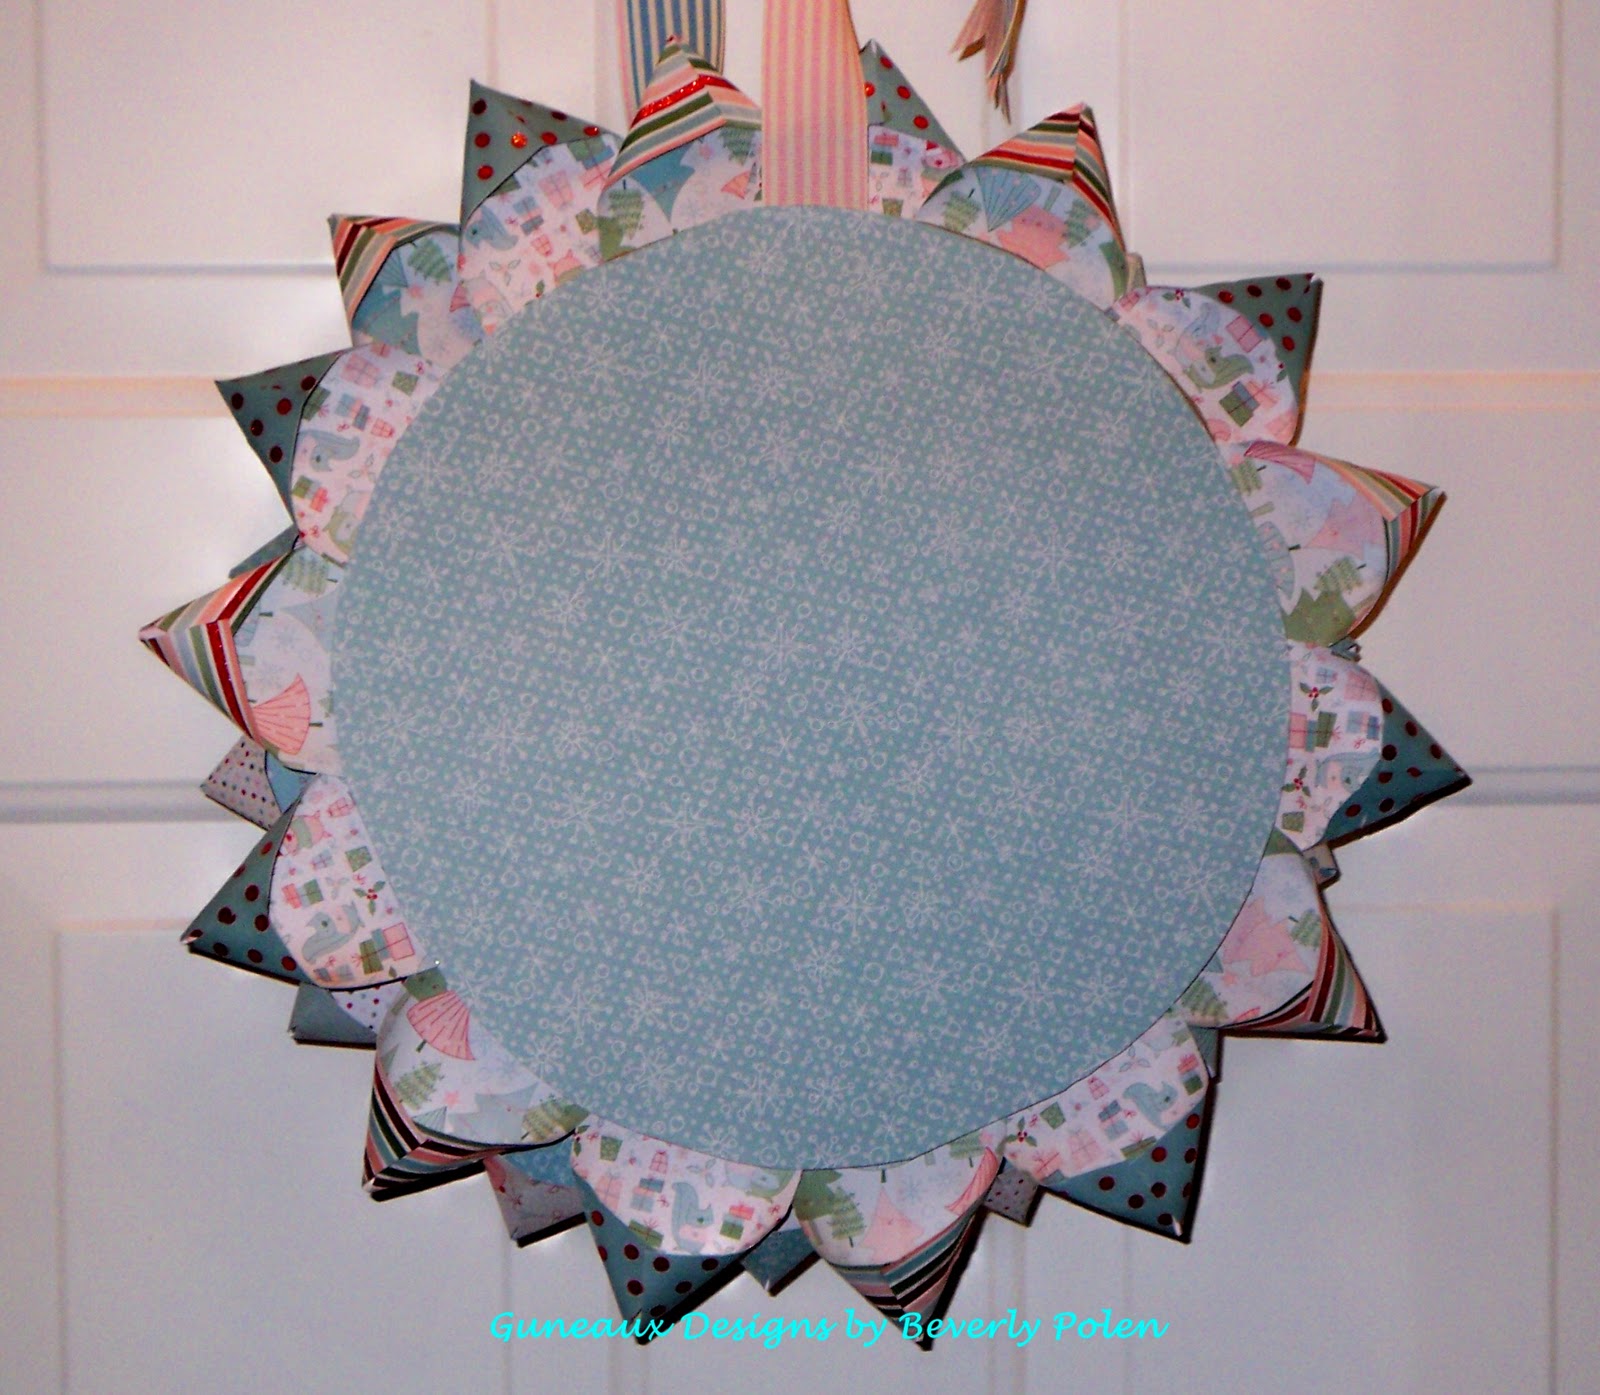
I want you to enjoy my last creation using the beautiful Candy Cane Christmas Designer Series Paper (DSP) as I share how you can make one too. 

Do you ever reach back to your teenage years and think of the art that you created then?  No matter how simple it was, I still remember a piece of art that I created in my high school "shorthand" class.  (Art and shorthand....[scratching head]...somehow they went together then LOL.) Well, this Candy Cane Christmas Wreath is a re-creation of that piece of art that I created in high school. Wow!  Such a long time ago, but pleasant memories!

The wreath looks more difficult to create than it is.  I cut strips of the Candy Cane Christmas DSP at approximately 5" x 2-3/4", glued together one of the long ends on each strip (creating a triangle), and began developing the wreath by adhering the first row to the outer edge of a piece of cardboard in the shape of a 12" circle.  I repeated the pattern until I had adhered all of the pieces that I needed to fill in the wreath.  I cut the paper strips to about 4" for the last two rows.  I think the Candy Cane Christmas DSP makes the wreath beautiful!  What do you think?

I used the fabulous Pretty in Pink and Marina Mist Stampin' Up! 1-1/4" Striped Grosgrain Ribbon to form a bow.  I used a strip of the Pretty in Pink Stampin' Up! 1-1/4" Striped Grosgrain Ribbon to create my "hanger", adhered it to the back of the wreath and attached the bow at the top.  You must buy this ribbon if you haven't already.  It is super to work with and so beautiful.  You will not be disappointed!

The center of the wreath is an eight-layer flower that I created using the Stampin' Up! Fancy Flower Punch.  I wove Stampin' Up! Silver Tinsel Trim within the flower to give it a little glitz.


Now it's your turn.  Make this easy wreath (using DSP of your choice) and send me pictures of your creation!  And, if you need to purchase any of the Stampin' Up! products, don't waste time searching for the item numbers. Just place your cursor over the product name above, left click, and the product will be right before you to purchase on line.

Don't disappoint me!  I want to see your creations; you still have time before Christmas arrives!

Jesus Christ is the reason for the Season! 
Merry Christmas to All who believe in Him!
Guneaux Designs by Beverly Polen
Stampin' Up! Demonstrator in Parrish, FL

beverlypolen@guneauxdesigns.com

Here to Serve You, the Customer!
Shop directly at my 24/7 Guneaux Designs Store and save!

Firm Reliance on Devine Providence!


Sunday, December 12, 2010

Candles and Decor Elements

I love sitting around a dinner table with family and lite candles as lite candles in the evening create such a warm, peaceful ambiance.  My family's Christmas dinner is always after the sun sets, and the table is set with lite candles glowing around the impeccably, delicious dinner.  We can't imagine Christmas dinner without the candles.  Because I love candles, I decided to use Stampin' Up! products to create the following designed candles and the table runner on which they sit. 

The table runner features the Candy Cane Christmas Decor Elements.  The Stampin' Up! Definitely Decorative Elements are so easy to use and create beautiful embellishments.

I was excited about using the Stampin' Up! Black Flourish Designer Jewels on this candle.  Don't they add such glitz?


This candle is decorated with the fantastic Stampin' Up! Silver Glitter Glass (wait until you see the new color of Glitter Glass that is coming out on January 3th!  It is beautiful!).  Other embellishments used include the ornament from the Stampin' Up! Tags til Christmas Stamp Set, Versamark Ink, Iridescent Ice Stampin' Emboss Powder, Marina Mist and Cherry Cobbler Classic Stampin' Ink, and the fabulous Silver Tinsel Trim.
It is sad to see the Stampin' Up! Holiday Mini Catalog go as it is packed with so many wonderful products.  However, the upcoming Occasions Mini Catalog is packed full with wonderful, bright, and cheerful products that will keep us satisfied! 

Don't waste time searching for the item numbers for the above Stampin' Up! products.  Just place your cursor over the product name, left click, and the product will be right before you to purchase on line. 


God's Blessings
Guneaux Designs by Beverly Polen
Stampin' Up! Demonstrator in Parrish, FL

Here to Serve You, the Customer!

Shop directly at my 24/7 Guneaux Designs Store and save!

Firm Reliance on Devine Providence!


Tuesday, December 7, 2010

Pop-Up Snowman

A few weeks ago while out shopping, I came across a very charming pop-up Christmas card featuring a snowman.  I was so intrigued by it that I purchased it, brought it home, and took it apart to see how it was made.  Well, I decided that I wanted to replicate it, or try to.  Here is my version after about three weeks of designing and developing.


SIDE VIEW

BACK VIEW

FOLDED FOR MAILING

I think it's beautiful; what do you think?

Stampin' Up! products used are as follows:

Marina Mist, Real Red, and Old Olive card stock; Stampin' Up! Celebrations Design Series Paper; A Cute Christmas - Snowman, My Digital Studio; Northorn Frost Decorative Strip; Frost White Shimmer Paint; Chunky Essentials, Fine Cosmo, and Fine Supernova Stampin' Up! Glitter; Clear Tinsel Trim; and Stampin' Up! Sticky Strip.

God's Blessings!
Guneaux Designs by Beverly Polen
Stampin' Up! Demonstrator in Parrish, FL

Here to Serve You, the Customer!

Don't forget that you will save on products if you shop directly at my 24/7 Guneaux Designs Store

Firm Reliance on Devine Providence!