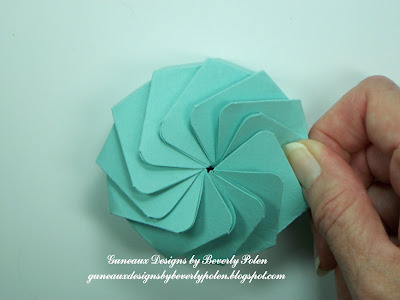
TIP 1. After assembling your box, push the top down, and with your fingers pinch tightly each fold along the top to ensure it is crisply folded. As a result, the top stays down without any adhesive. (My final box was made with a different cardstock than that in this picture.)
TIP 2. If you choose to add an embellishment around the circumference of the box, it cannot be glued to the box or the box won't open. I chose to add ribbon around the box. To add ribbon, measure the circumference of the box. Use this measurement to cut a piece of ribbon (or another type of embellishment). Glue the ribbon ends together and add an embellishment to the ribbon if desired.
TIP 3. Create another embellishment for the box top (I created a butterfly). You want to strategically add the embellishment to the box top in a manner that allows the box to open. To accomplish this, I added crystal effects to the center of ONE fold, ensuring that I did not get it anywhere but on the one fold. I then placed the bottom left wing of the butterfly to the adhesive. You will determine where on one fold to add your embellishment, depending on what it is.
TIP 4. After adding your embellishment, catch one fold with your finger and pull. Volia! The box opens with the embellishment attached and not in the way. The box is ready for you to insert a piece of jewelry, candy, or any small gift.
TIP 5. Fold the box back together and push the top back down.
TIP 6. Add your embellishment around the circumference of the box. I pushed my ribbon onto the box from the bottom up to the center. The ribbon fits snugly.
TIP 7: The assembled box is 1 1/16" deep and 2 1/2" wide. I can easily place two bite-size candy bars inside and it is perfect for a bracelet or necklace that is flexible and just falls into a "pile" when placed in the box. This picture shows the box with two necklaces and matching earrings inside.
Now, how perfect is that? And what a beautiful gift box to give to a special someone.
The following picture is a top view of the box.
God's Blessings!
Guneaux Designs by Beverly Polen
Stampin' Up! Demonstrator in FL
FIRM RELIANCE ON DIVINE
PROVIDENCE!
ENJOY MAKING STAMPIN'
UP! GREETING CARDS!


1 comment:
Gorgeous Beverley & thank you so much for your instructions on how you did your box.
Post a Comment