Pages

Showing posts with label Stampin Up Greeting Cards. Show all posts

Wednesday, February 15, 2012

Mouthwatering and Sweet Cake

What an appropriate name for the Stampin' Up! stamp set, Mouthwatering!  The stamps make me want to have ice cream, cherries, and yummy watermelon!  To top off the stamped images is the Stampin' Up! aromatic Melon, Cherry, and Vanilla Scented Embossing Powder.  Smells soooo gooood!

This card features the watermelon stamp from the Mouthwatering stamp set, and the greeting, "You're So Sweet" is from the Sweet Cake stamp set.  
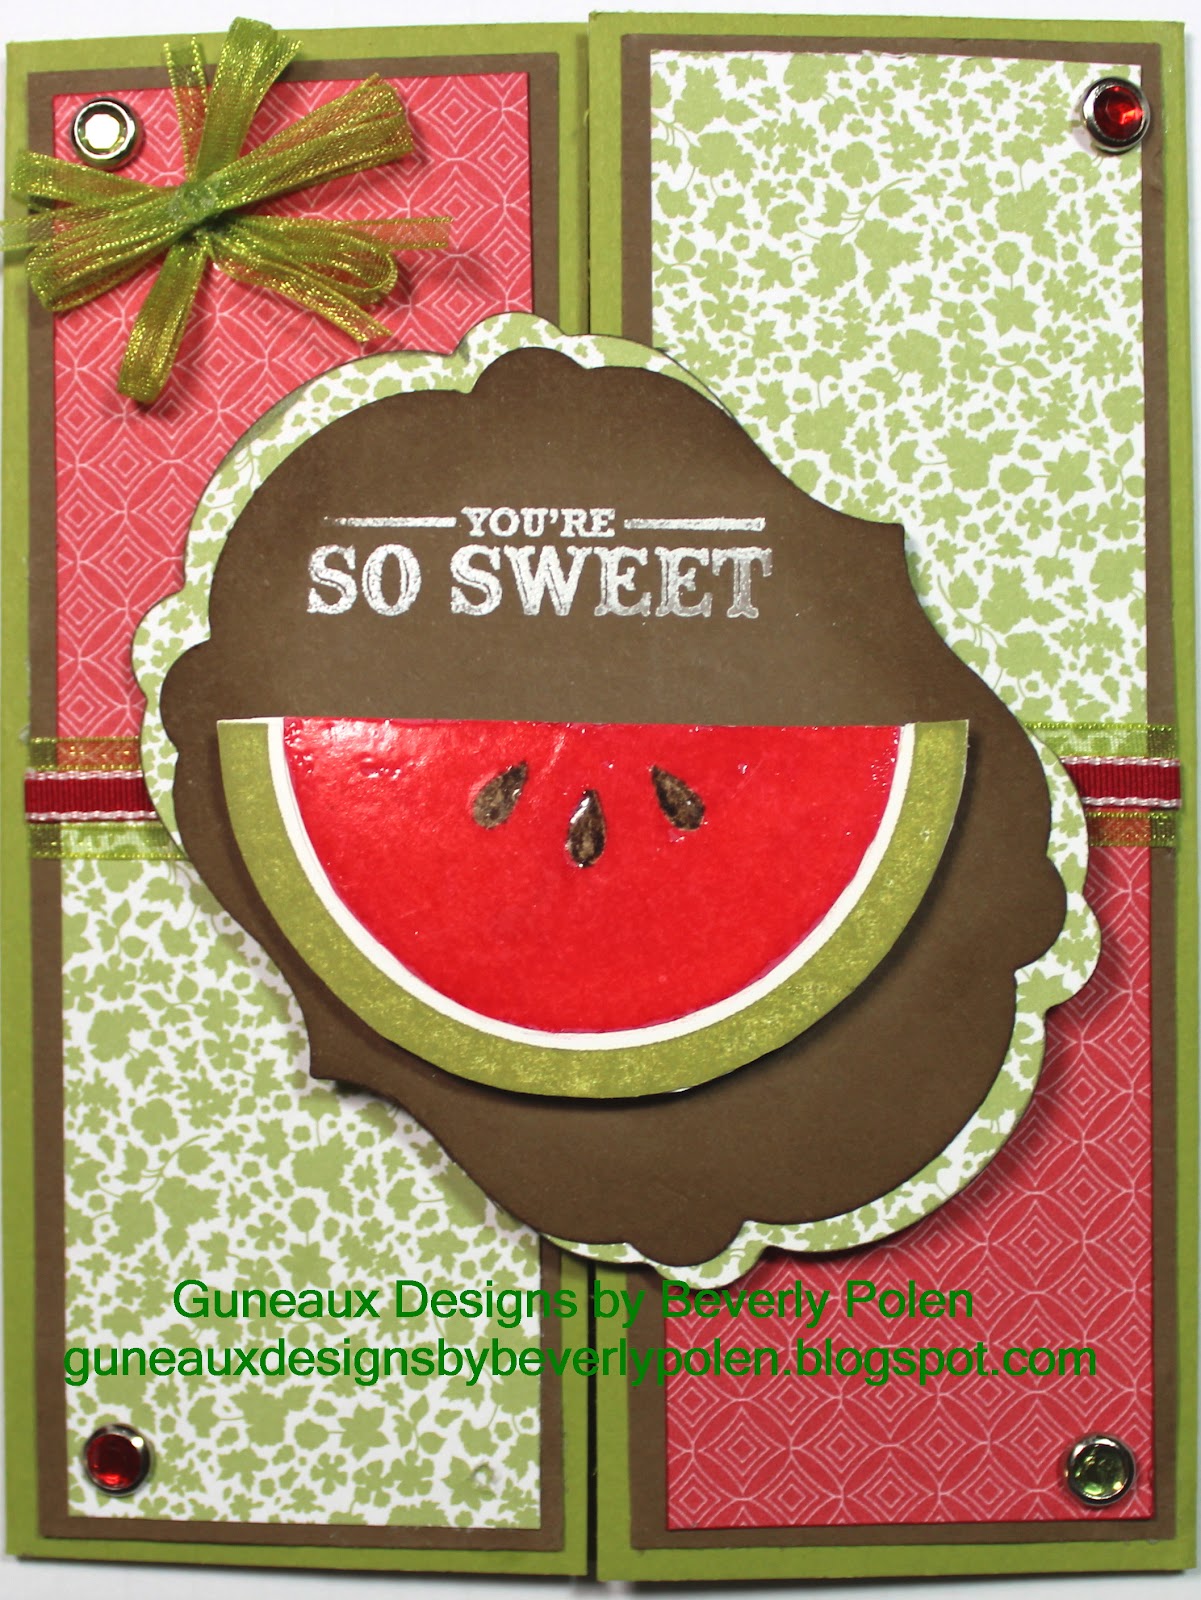
The Pear Pizzazz design of the Twitterpated Designer Series Paper (DSP) is featured on the bottom left and top right of the card.

The Villa Real Red DSP that is at the top left and bottom right of the card is a digitized DSP that I printed from Stampin' Up!'s My Digital Studio software.

If you don't have My Digital Studio, I strongly encourage you to try it during Stampin' Up!'s promotion where you can download it on a trial period that ends March 1.  I promise you will love the software.

To download a trial version of My Digital Studio, click HERE!  How can you pass up something that is FREE?

Monday, February 6, 2012

Stampin' Up! Attic Boutique DSP


Did you have a nice weekend?  It was beautiful here in West-Central Florida.  I spent time working in my yard, which I love doing.  Can you believe that I already have Azaleas blooming? I love it!

I also worked on some Stampin' Up! projects.  This one features Stampin' Up!'s Attic Boutique Designer Series Paper (DSP).  Don't you agree that the DSP is just beautiful?  It's easy to create a card using this DSP by just cutting some of the floral patterns from a DSP design, as I did on this card.  This card is very simple as it's basically Daffodil Delight cardstock with a floral pattern from the DSP.

The second picture below is a close-up of the top portion of the card.  I punched a circle at the top of the card, created some lattice work, added a Zentangle flower, and used my brayer to create the background.  Enjoy!


Stampin' Up! Supplies Used:
Paper (Cardstock and DSP):  Daffodil Delight (119683), Whisper White (100730), Old Olive (100702), and Attic Boutique (125407)
Ink (Classic and Markers):  Calypso Coral (122939), Old Olive (100079), Lucky Limeade (122935), Marina Mist (119668), and Not Quite Navy (103008)
Accessories:  2-1/2" Circle Punch (120906), Blossom Party Original Die (1159710), and Brayer (102395)

BUY STAMPIN' UP! PRODUCTS HERE!

Monday, December 12, 2011

Stampin' Up! Snowman Greeting Card - Iris Folding


I hope you had a great weekend, and thanks for stopping in to see this Stampin' Up! greeting card that features the art of iris folding.  I really like the card, and I think it's very cute, don't you?  Have you created greeting cards featuring the art of iris folding?  If not, I encourage you to give it a try; it is so fun and you get such a feeling of accomplishment.  There are a lot of good patterns on the Internet to use.  I have created my own patterns before, but this snowman is not one of mine. 

As for the design of the card, the base is Garden Green card stock and the first layer is Real Red card stock.  The Frostwood Lodge Designer Series Paper was used for the snowman's hat and scarf, as well as the photo corner pieces.  The rim of the hat is made with the Silver Glimmer Paper.

The snowman's body is made with Whisper White card stock that was embossed with the Snow Burst Embossing Folder.  Enjoy!

Purchase the products used for this project by clicking on the product links and you'll to be taken to my Stampin' Up! on-line store.

God's Blessings!
Guneaux Designs by Beverly Polen
Stampin' Up! Demonstrator in FL

Friday, November 11, 2011

USA Veterans Day

May we be grateful for the military men and women who gave their lives while exhibiting such courage in bravely protecting our freedom.  May God richly bless the families who lost a precious loved one in any war/conflict.


God's Blessings
Guneaux Designs by Beverly Polen

Monday, October 10, 2011

Stampin' Up! Greeting Card - Blue Chateau DSP - Breast Cancer Awareness

Good morning and thank you for stopping by to see my Stampin' Up! projects.  I hope you enjoy them.  I decided that this week's posts will focus on Breast Cancer Awareness, Halloween, Thanksgiving, and Christmas.  Don't forget to come back for each feature.

Have you tried the Stampin' Up! Beau Chateau Designer Series Paper (DSP) yet?  If you have, you'll agree with me that the designs are so pretty, especially the Soft Suede and Pink Pirouette design that I used on this card.  The design in person looks like a shimmery gold. 

Because October is Breast Cancer Awareness Month, this card would meet a need for a card to give to someone who currently is struggling with breast cancer.


The card was made from a 11" x 6-1/4" piece of Pink Pirouette Cardstock, and the fold of the card is called "Gatefold".  After folding the card, I cut the Beau Chateau Designer Series Paper into sections to match the card panels and attached them with Sticky Strip.  For decorations, I used the butterfly stamp from the Creative Elements Stamp Set (love, love this stamp set) to stamp twice the butterfly image onto a piece of the DSP.  Then I cut out the butterflies, decorated them with Basic Pearls, and adhered them to a frame made with the Designer Frames Embossing Folder.  To create the scallop border on the two front pieces, I used the Scallop Edge Border Punch.  The card inside includes images from the Thoughts and Prayers Stamp Set.

Purchase the Stampin' Up! products used for this card by clicking on the links above.

Leave a comment; I'm sure other visitors would like to read your feedback about this card.

God's Blessings!
Guneaux Designs by Beverly Polen
Stampin' Up! Demonstrator in FL
FIRM RELIANCE ON DIVINE PROVIDENCE!
ENJOY MAKING STAMPIN' UP! GREETING CARDS AND OTHER PAPER CRAFTS!

Tuesday, October 4, 2011

Zentangle Pumpkin

10-9-11 UPDATE:  I just discovered that my Zentangle® Pumpkin was featured as an article for last weeks' "roundup" on a Certified Zentangle® Teacher's website, Tangle Harmony!  I don't know the teacher, but what an honor to be featured!  This is so exciting!!

____________________________

My project share today is another Stampin' Up! Greeting Card featuring the art of Zentangle®!  The main element on this card is the pumpkin which I drew and included several Zentangle® patterns.  I hope you like it as much as I do.  I'm really getting into tangling, and I think it adds a nice touch to Stampin' Up! products.  Have you tried tangling yet?


If you have an interest in learning the art of Zentangle® to include on your Stampin' Up! crafts, google the word "zentangle" and you'll find lots of patterns.  Unfortunately I can't instruct you on the patterns I used on both the pumpkin and sentiment, but I certainly can share the Stampin' Up! products that I used.  Speaking of Stampin' Up! products, did you know that Stampin' Up! rubber stamps were listed in the October 2011 issue of the Creating Keepsakes magazine as one of the TOP 10 MUST HAVES?  Gosh, did they ever get that right!!

Supplies:

Stamp Set:  Always Thankful   (page 19 of the Holiday Mini Catalog)
Cardstock:  Peach Parfait, Old Olive, Basic Black, and Whisper White
Ink:  Peach Parfait, Tangerine Tango, Cajun Craze, and Basic Black
Accessories:  Antique Brads, Brads-Neutrals (Basic Black), Lace Ribbon Border Punch, Leaves #2 Die, and Basic Black Taffeta Ribbon

Buy the Stampin' Up! products for this project by clicking on the links above.  You'll be taken directly to the product on my on-line store. 

Leave a comment regarding your thoughts about this card.

God's Blessings!
Guneaux Designs by Beverly Polen
Stampin' Up! Demonstrator in FL


FIRM RELIANCE ON DIVINE PROVIDENCE!
ENJOY MAKING STAMPIN' UP! GREETING CARDS AND OTHER PAPER CRAFTS!

Monday, October 3, 2011

Stampin' Up! Autumn Splender

Thanks so much for stopping in to browse my Stampin' Up! greeting cards and other paper crafts.  You may have noticed that I've not posted any projects for several weeks.  There was a family tragedy that took all of my time; therefore, I was unable to complete a project for posting.  I do apologize for my unavailable, but I'm sure you'll understand.

Now to my Stampin' Up! greeting card that features the wonderful leaves of the Autumn Splendor Stamp Set.  This card also features the "Against the Edge" technique with a small amount of Zentangle®.


 Stampin' Up! Supplies:

Stamp Sets:  Autumn SplendorGod's Blessings (the sentiment), and Borderlines
Classic Stampin' Pads (Ink):  Certainly Celery, Tangerine Tango, Cajun Craze, and VersaMark 
Cardstock:  Whisper White, and Cajun Craze 
Designer Series Paper:  Well Worn

Against the Edge Tutorial 

Instead of providing the exact instructions for my card, I am providing instructions for the technique used to produce the card.  Try the technique; it's so cool and it is from http://patstamps.com.

1.  Ink a long word, tall flower, or similar stamp and vertically stamp the image one-third of the way in from the right side of your cardstock that will be the top layer on your card.  (For my card, I used a stamp from the Borderlines stamp set that I inked with VersaMark and embossed the image with gold embossing powder.)
2.  Stamp the image again on a large Post-it® note, assuring that the left side of the image is at the top of the Post-it® note.  This will be used as a mask; therefore the sticky part of the note will be needed.
3.  Trim off the right side of the image on the Post-it® note to create a mask.
4.  Place the mask over the stamped image on the cardstock, aligning the images.  (This is why the sticky part of the note needs to be on the left side.) 
5.  Choose another long stamp, such as a detailed background stamp and stamp the image onto the right side of the cardstock and onto the Post-it® note mask, but not on the left side of the cardstock.  (For my card, I used a leaf stamp from the Autumn Splendor stamp set and the masking technique.)
6.  Remove the mask and finish the card as desired.

For the above card, I used a Zentangle® pattern on the upper-right and lower-left sides of the sentiment.  I am really loving the Zentangle® art!

 Leave a comment about what you think of the "Against the Edge" technique!

God's Blessings!
Guneaux Designs by Beverly Polen
Stampin' Up! Demonstrator in FL
 
 
FIRM RELIANCE ON DIVINE PROVIDENCE!
ENJOY MAKING STAMPIN' UP! GREETING CARDS AND OTHER PAPER CRAFTS!

Monday, September 5, 2011

Stampin' Up! Greeting Card - Berry Blossoms Happy Halloween

Thanks for stopping by to see my Stampin' Up! Greeting Card feature for today!  It is a Happy Halloween greeting card that  highlights the new Stampin' Up! Simply Scored Scoring Tool (see bottom of post for a pic.).  I had fun making the card and I think it is so cute!  What do you think?


FRONT VIEW

The card's base is Wild Wasabi Cardstock, topped with Soft Suede Cardstock that I ran through the Big Shot, using one of the Stampin' Up! Backgrounds1 Texturz Plates.

The primary element on the card is the pumpkin that I made using the new and MUST HAVE  Stampin' Up! Scoring Tool and a Calypso Coral design from the Stampin' Up! Berry  Blossoms Designer Series Paper (DSP).  Cutting two 2" x 9" strips of the DSP, I used the scoring tool to score the DSP at every 1/2" on one side.  I then turned the DSP over and scored  at every 1/2", starting 1/4" from the first score line on the front side (do this for both pieces).  After scoring, the scores lines will be 1/4" apart.  I folded the score lines in an accordion fashion and glued the ends of both pieces together to form the pumpkin. 

The pumpkin's face is made with Black Cardstock that I embossed with Stampin' Up! Black Embossing Powder to give it a shine.   I used the 1-1/4" Circle Punch to make the pumpkin's eyes, cutting a portion from them.  The nose was made with the Petite Pennants Punch, and the mouth with the 2-1/2" Circle Punch (I cut the circle in half and cut sections for the teeth).  What do you think of the face?


SIDE VIEW

I share this side view to provide a better view of the 3-D parts of the card.

The inside of the card includes the sentiment, "Happy Halloween" from the new Stampin' Up! Hand-Penned Holidays Stamp Set.


CLOSE UP OF LEAVES AND VINES

I cut the leaves with Whisper White cardstock and the Stampin' Up! Leaves #2 Originals Die.  Using  Stampin' Up! Daubers, I colored the leaves with Certainly Celery, Pear Pizzazz, and Garden Green Ink.  Then I used Cajun Craze Ink on selected spots of the leaves. 

For the vines, I used the 1-1/4" Circle Punch to cut a circle from Wild Wasabi cardstock.  I covered it with Cajun Craze ink.  Starting from the outside of the circle and moving toward the middle, I cut in a circle motion.  I then pulled the circle apart to create the pumpkin vines.


If you haven't seen the Stampin' Up! Score Tool yet, here is a picture.  If you haven't already, you should buy this product as it works very efficiently.  It's the best scoring tool that I have used.  And the three place markers that are included with the tool make it so easy to make repetitive scores as you use them to mark your correct score lines.  No mistakes made with this tool!!  Buy it; you'll love it too. 


It is quite simple to purchase the products used for this project.  Just place your cursor over the product names in my post and  left double click.  The products will come up for purchase at my 24/7 Stampin' Up store.  

God's Blessings!
Guneaux Designs by Beverly Polen
Stampin' Up! Demonstrator in FL
FIRM RELIANCE ON DIVINE PROVIDENCE!
HAVE GREAT FUN MAKING STAMPIN' UP GREETING CARDS AND PAPER CRAFTS!

Wednesday, August 31, 2011

Stampin' Up! Delicate Doilies and Zentangle

My Stampin' Up! greeting card for you today features the Stampin' Up! Delicate Doilies Stamp Set and the art of tangling or doodling. 


The card base is made with the Stampin' Up! In Color, Pool Party.  The first layer is So Saffron cardstock of which I tangled along the outside.  This zentangle pattern is called "Cadent".  It took some time to master it as well as draw it around the cardstock.  What a relaxing form of art!

The second layer is Pool Party cardstock that is embellished with the Stampin' Up! Houndstooth Embossing Folder.  It is wrapped with Wisteria Wonder 3/8" Ruffled Ribbon.  For the doily, I stamped one of the images from the Delicate Doilies stamp set three times onto Whisper White cardstock; once each in Wisteria Wonder, Pool Party, and So Saffron Stampin' Inks. I cut out the middle section of the Pool Party doily and the center of the So Saffron doily and layered them on top of each other using Stampin' Dimensionals.  The doily is topped of with a Stampin' Up! Basic Rhinestone Jewel.  The "heartfelt thanks" sentiment is from the Stampin' Up! Fabulous Phrases Stamp Set, and it too included rhinestone jewels.

Buy the Stampin' Up! products by clicking on the links above.  They will take you directly to my Stampin' Up! 24/7 store.

God's Blessings!
Guneaux Designs by Beverly Polen
Stampin' Up! Demonstrator in FL
FIRM RELIANCE ON DIVINE PROVIDENCE!
ENJOY MAKING STAMPIN' UP! GREETING CARDS AND OTHER PAPER CRAFTS!

Monday, August 22, 2011

Stampin' Up! Creative Elements - You Mean the World to Me

Don't you just love the new Stampin' Up! Creative Elements Stamp SetBuy this set as you'll find several uses for it.  My Stampin' Up! Greeting Card today features this stamp set along with the Stampin' Up! Word Play Stamp Set

I used two stamp images from the Creative Elements set, the flower and flourish flair (my name for the stamp).  I inked the flower in Island Indigo Ink and stamped it on Whisper White cardstock three times.  I cut out the three flowers, leaving one for the bottom layer.  Then I cut out the the middle section of the second flower and the very center part of the third flower, assembling them with Stampin' Up! Dimensionals to give the flower a 3-D effect.

I inked the flourish flair stamp with Pool Party Ink and stamped randomly onto the Pool Party Cardstock, which is the base for the card.  I added six strips of Rich Razzelberry Cardstock to the top and side of the card and embellished them with the Creative Elements flower and Island Indigo flowers made with the Boho Blossoms Punch

The sentiment, You Mean the World to Me, from the Word Play stamp set, was stamped onto Pool Party cardstock with Island Indigo ink and mounted onto Rich Razzelberry and Island Indigo cardstock.  Lastly, Basic Pearls Jewels were added for an additional embellishments.

Thanks for stopping by and I hope you enjoy my creation.  Don't waste time searching for the products used in this project.  Just click on the links and you'll be taken directly to the product at my on-line store.


God's Blessings!
Guneaux Designs by Beverly Polen
Stampin' Up! Demonstrator in FL

FIRM RELIANCE ON DIVINE PROVIDENCE!

ENJOY MAKING STAMPIN' UP! GREETING CARDS!

Wednesday, August 17, 2011

Stampin' Up! Greeting Card - Paper Quilling

Have you tried to make a Stampin' Up! Greeting Card by paper quilling?  What is paper quilling, you ask.  Quilling (also known as paper filigree) was born over five hundred years ago when artists discovered that narrow strips of paper could be rolled, scrolled, fluted, and fringed and then arranged on their edges to create beautiful designs.  Today, though quilling tastes, tools, and even materials have changed, this fascinating art form still thrives.

Yesterday I received my September issue of "Stampin' Success" (a magazine for Demos only), and it contains an article on paper quilling.  This article inspired me to develop this greeting card using the art of quilling, which I've not done in a while.  I hope you like it!


To make this card, I first used that wonderful Stampin' Up! creation - the Lace Ribbon Border Punch - on a piece of Old Olive cardstock.  To this I added tape and filled the ribbon with Aqua Stampin' Glitter.  I added the ribbon to the bottom of my Tempting Turquoise card front, only showing a portion of the ribbon.  Then on a circular piece of Whisper White cardstock, I began quilling cardstock to form my flowers, buds, stems, and leaves.  Yes, you can use Stampin' Up! cardstock when quilling.  The Stampin' Up! Designer Series Papers are easier to quill, but don't let anyone tell you that you cannot use cardstock.

How do you quill?  Here are basic instructions; however, if you've not quilled before, you should research the art to get a complete understanding of how to quill.


TUTORIAL
The basics of quilling takes surprisingly little.  In fact, two functional hands, some strips of cardstock or DSP, one quilling tool (a Stampin' Up! piercing tool will do the trick; just don't prick yourself), glue, and you're off to a good start.  There are other tools for quilling, but for the basics, this is all you need.

Step 1:  For the petals of the above flower, you will cut seven strips of cardstock or DSP (your choice) at 1/8" x 6".  With the seven 1/8" x 6" strips, you'll make seven "Marquise Flowers".

Step 2:  To make Marquise Flowers, use your piercing tool (or a slotted quilling tool), placing the end of a strip either around the piercing tool or into the slot of the quilling tool.


Step 3: Turn the tool towards you, rolling up the paper into a "Loose Circle".


Step 4:  Place glue on the end of the Loose Circle and attach it to the side.


Step 5:  Pinch the Loose Circle on opposite sides.  Now you have a Marquise Flower (or a petal).


Step 6:  Cut a piece of cardstock or DSP at 1/8" x 3" and roll it up in the same manner as Step 1, except make it tight ("Tight Circle").  Glue the end to the side.  Start gluing onto a piece of cardstock (circle, square, etc.) the Marquise Flowers at the ends and onto the Tight Circle until you have all seven flowers into place.


Step 7:  Make a stem by cutting a piece of green cardstock at 1/8" wide and as long as you need.  Glue the stem on its side between two Marquise Flowers on a piece of cardstock (circle, square, etc.) (see picture of card for placement). 

Step 8:  To create the leaves and a portion of the buds, cut cardstock or DSP into 1/8" x 3" pieces.  Follow Steps 1, 2, 3, and 4.

Step 9:  Pinch only one side of the leaves and buds to form "Teardrop Flowers". 

Step 10:  For the remainder of the bud, cut a piece of cardstock or DSP at 1/8" x 2".  Fold the piece in half creating a V shape.

Step 11:  Using the Piercing Tool or a Slotted Quilling Tool, roll one side of the V towards you and the other away from you.  This creates a "V Scroll" into which you glue a Teardrop Flower (the bud).

Step 12:  Follow Step 8 to create a stem and glue it onto the end of the bud.  Add a green Teardrop Flower for a leaf, and glue these to the cardstock.

Step 13:  Glue your stems together and attach to cardstock (see card for placement).

Step 14:  Use either the Blossom Petals Builder Punch to cut two leaves or create them by cutting out a leaf shape from green cardstock.

Step 15:  Curl the leaves slightly and glue them to the bottom of the stems.

YOUR DESIGN IS FINISHED!  I hope to hear from you regarding my card and this tutorial. 

Purchase the products used for this project by clicking here or click on the links above.

God's Blessings!
Guneaux Designs by Beverly Polen
Stampin' Up! Demonstrator in FL
FIRM RELIANCE ON DIVINE PROVIDENCE!

ENJOY MAKING STAMPIN' UP! GREETING CARDS!

Monday, August 15, 2011

Stampin' Up! Thank You Greeting Card - Berry Blossoms

Thanks for stopping by to see my Stampin' Up! creations!  I hope you had a great weekend!  My card share for you features the attractive Berry Blossoms Designer Series Paper (DSP).  I have to admit that I was hesitant initially to purchase this DSP.  Now that I've used it, I'm glad I purchased it.  The colors are so bold, and I love bold colors.  Take a look and share what you think about the card.

 
As the first card layer, I placed a piece of the Berry Blossoms DSP to a Wisteria Wonder card.  Then I decided to place a pleated band made with a piece of the DSP as the second layer on the center of the card.  To make the band, I took a 3" x 10" of the DSP and scored it at 1/4" and 3/4" intervals.  I folded the first scored line forwards, the second backwards, continuing in this manner down the entire piece.  I adhered the pleats on the back with tape to keep them in place before adding them to the card.  Next I added a piece of the DSP that matched the first layer to a piece of Wisteria Wonder cardstock and place it across the center of the pleats.  I topped it off with two scalloped circles with a sentiment from the Elegant Thank You stamp.


I hope you enjoy my creation; it is a simple Thank You card to make!  If you don't have this DSP, I encourage you to buy it, especially if you like bold colors.  You can buy it and other products here.

God's Blessings!
Guneaux Designs by Beverly Polen
Stampin' Up! Demonstrator in FL
FIRM RELIANCE ON DIVINE PROVIDENCE!

ENJOY MAKING STAMPIN' UP! GREETING CARDS!